
AUSSIE FARMTRUCK
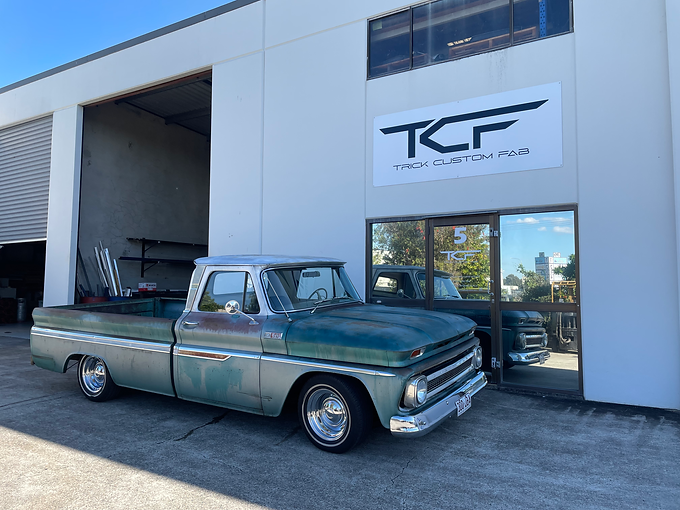
Benny came to see us with his 1965 Chev C10, with plans to airbag the truck for a nicer ride, to use as a daily driver. We always ask, how low do you want to go? This will basically set out the foundation of the build, what parts are needed and an approximate cost and build time. As we do with all our airbag builds for the C10 platform, we seperate the heights into stages:
Stage 1 is a C-Notch using the factory front x-member (lowered)
Stage 2 is a Bridge Notch using our TCF Bridge and TCF Front Drop Member (slammed)
Stage 3 is our Rear Clip and our TCF Front Drop Member (layin' frame)
What we mean by layin' frame, is the chassis sits on the ground fully aired out. All of these kits include Air Management and lots of other parts we design and manufacture here.
It takes commitment to go to Stage 3, and that's what Benny wanted. The foundation was set, a plan was in-place, so we started stripping the truck down to the bare chassis. This was a 100% rust free, and original paint truck, with only a few things done like a seat cover, chrome wheels and astra power steering pump.


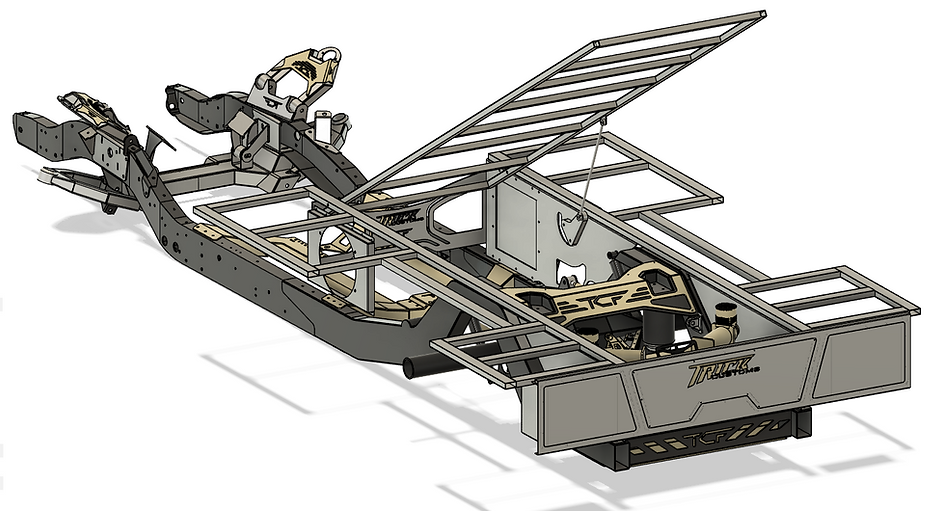
Lets talk Chassis: the chassis design is all done here by us, with revisions perfected over many years. We started by 3D scanning a factory 63-72 chassis front to back, from there we were able to design and develop our Stage 3 package you see below, which includes our Airbagged, parallel 4-link Rear Clip, Frame Stiffener and front Drop X-Member. All this is done using the factory chassis, we like using the factory chassis as it retains its chassis number up front, and under Australian Design Rules (ADR) a complete new Australian-made chassis needs to be RHD, this truck we wanted to keep LHD and Benny wanted to keep it long-bed (typically all aftermarket US-made chassis are all short-bed)
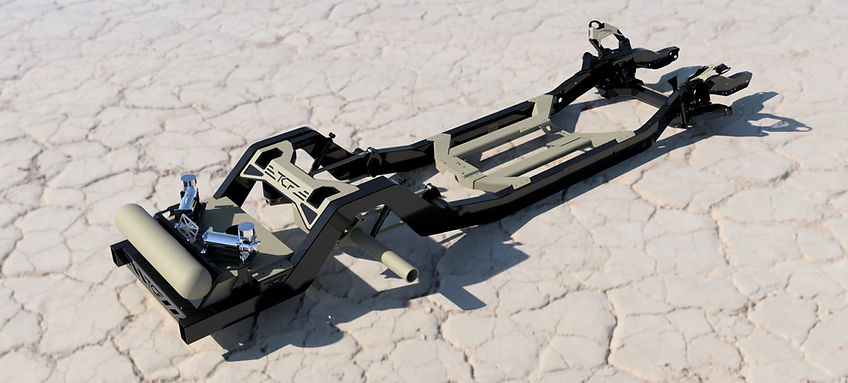

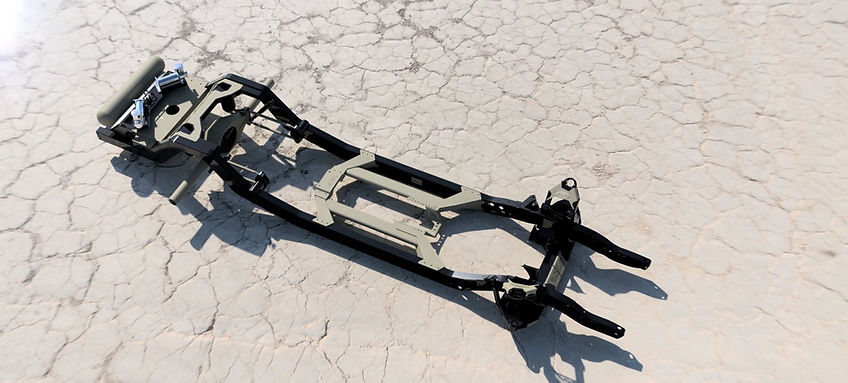

As you may notice, lots of components and details are shown. We plan everything about these trucks before we even turn loose one bolt. Components including; Air Management, Fuel system, Differential, transmission selection, engine selection, exhaust routing and services plumbing to name a few are all thought out prior to any cutting. It takes a level of experience to know what problems will arise halfway through a build if their not planned from the very beginning, something we focus very strongly on and we take very seriously. In turn, this reduces build times and reduces additional costs down the track.
Lets talk the rear clip, its designed to lay frame on a 31" tall tire, runs a parallel 4-link suspension and has 9" of overall suspension travel. The fuel tank is a one-off design for this chassis, as is the compressor platform, ECU mount and air-tank. The height of the rails is critical, that height also sets the height of the raised timber bed floor which is also planned to sit at a specific height on the 63-66 trucks (something we see other car builders overlook all too often).

Our front Drop X-Member is a completely bolt in piece (just like the factory crossmember), using the same bolt holes in the factory frame. It is shorter than the factory unit allowing the frame to lay on the ground, when typically this would be the lowest part of the truck. Which means all pivot points are raised up and geometry is improved. We narrowed the track-width to allow wheels to clear the fenders in the 63-72 trucks, and built in a specific and very secretive angle of caster. Our units are completely designed and fabricated in-house and feature fabricated top and adjustable bottom control arms, front mounted power rack & pinion and include mounts for small block, big block and LS engines.

The frame stiffener is a new design of ours, designed for the Stage 3 kit. Completely bolt in unit, includes boxing plates that sit inside the factory chassis to create a very rigid mid-section. It has an adjustable transmission mount which will work with all GM automatics and manual transmissions and a bolt-in center bearing support. Its design allows for the use of a 3" exhaust and x-pipe running underneath the component (an issue with most aftermarket stiffeners on the market). The boxing plates feature small bolt-in flush mounted plates that allow you to run your fuel/air/transmission lines or wiring through and keep it neat and hidden.
Photos below show the factory chassis on the chassis jig, rear clip, stiffener being welded in and mock-up of the front Drop X-Member.


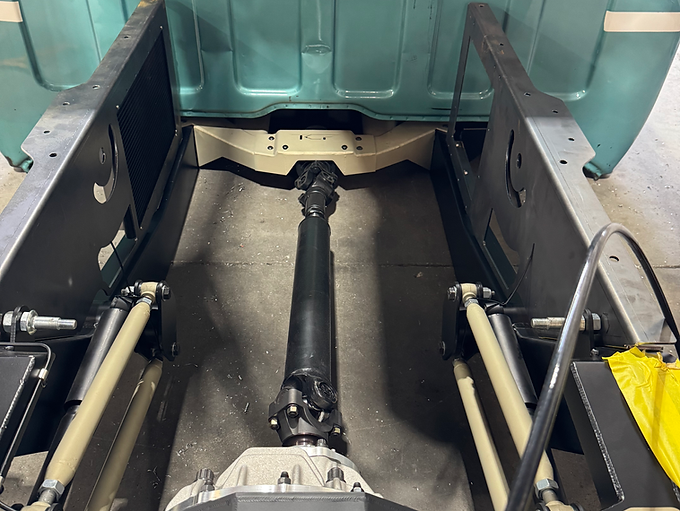
With the chassis all complete, the Fabricated 9" Housing from Race Products went in, along with the 4-link bars so we could finally have a roller and start mocking up the dummy engine and cab to check our engine placement. Strange Alloy 9" centre section running Dutchman 35 spline axles complete the diff assembly.


We're happy with how it sat and everything measured correctly, so the cab and engine came back out and the chassis stripped again ready for paint. We did a 2k matte clear over black base. The stiffener centre, transmission bracket, bridge faceplate, watts link faceplates, control arm cover plates, fuel tank, compressors, air tank and various small parts were Cerakoted a champagne colour by our friends Thermal Edge Coatings.


Components going back onto the chassis after being coated. Note the Watts-Link, which is custom for the Stage 3 Rear Clip to keep the diff truly centre over the entire 9" of travel. This truck wears big Wilwood brakes all round with 14" 6-piston fronts on a Pro-Spindle and 13" 4-piston rears with an electric park brake.
Lots going on in the background while the chassis is being prepped and welded out. We designed up some one-off 2-piece wheels and had them cut from billet, big 22x12" on the rear and 20x8.5 on the front with our custom offsets.


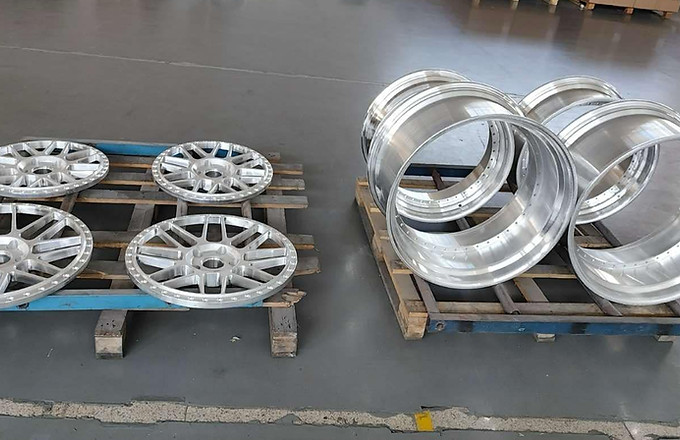
Finished off in the same Cerakote colour and black centre and TCF Centre cap. Wrapped in 335 rubber.


The engine that was picked for this build was a LS3 we had in stock here but we sent it out to Cowie Performance Engines for a full build. BTR Stage 4 Cam package was thrown in, amongst other goodies, it will run twin PSR turbos on it through a Built 4L80 and custom ASNU billet Converter. Photo below show the engine and trans getting same colour treatment. before going back into the chassis for the last time.


We are running all hardline throuout this truck; fuel feed & return, trans feed & return, air to front bags, brake line and A/C all run through the boxed chassis exiting at the rear clip and running externally and to services like the trans cooler and AC.


Wheels were fitted, engine and trans in the chassis and we had a roller again. Some pics we took rolled out in the sun. Billet intake, exhaust manifolds and turbos on, front drive from Heavy Metal Garage mounted and rocker covers hiding the coil packs all coated and looking the goods.


Our TCF Optima Battery boxes we sell in our store, are mounted. We are running 2 on this truck.


The cab was given a scuff just to clean up the surface so we could shoot a few coats of binder and 2k HS Clear to preserve this 60 year old perfect original patina! The roof we shot in an Ivory White with a matte clear.


Fenders and front grille were shot in HS clear aswell, grille and bumper were shot in matte clear and we think it turned out exactly as we envisioned. Piecing it all together knowing it has to come back apart eventually. We were preparing it for the Performance Pulse Expo 2025, so wanted to have it as complete as we can. Photos below showing it coming together and some shots at the show all layed out.


The next step in the build was setting the bed onto the chassis, this was planned and drawn out early in the build so we knew exactly how it was going to look and perform. Cad drawings below show the rear chassis/bed frame. Youll be able to spot quite a few components under there like the A/C condensor, transmission cooler, the rear filler panel, storage boxes, and lets not forget the centre lift-up bed panel. All the steel framework for the timber was created and every detail included.
.png)


Rear bed brackets going on, cutouts for A/C Condensor, exhausts and the billet cantilever bed lift brackets. Next comes the framework for the timber top and centre bed raise panel and the rear filler panel and storage boxes. These boxes will have flip down doors on the front with some bead rolling for strength.


Bed came back off to weld and paint the frame, then the original paint was prepped and cleared. Back onto the chassis for the last time.


We wanted to have a center lift up bed panel to showcase all our custom components, so we went ahead and designed a cantilever hinge kit which are designed to work with Dakota Digital linear actuator, capable of lifting 100kg per actuator. These are made from billet and feature roller bearings at all pivot points.


We are still building Farmtruck, so be sure to visit again for more updates!
Updated as of November 2025